We've been seeing an increased number of partners who want to move their customer's AVD Environments to a different Azure Region and/or Subscription.
I decided to take this Move AVD to a new Azure Region – Nerdio Help Center post and expand on it with more detail to make it easier for partners to be able to do this without needing to deal with the "oppsies" and "gotchyas" that can sometimes come-up with a migration.
Notes and Disclaimers:
These are just my ideas.
You will want to make sure you have backups and test this process out before you move a production environment. 🤓
At the time of writing, only some Azure Resources support being moved.
For the latest list, please see Move operation support by resource type - Azure Resource Manager | Microsoft Learn.
Prepare the New Resources
- If you haven't done so already, create a new Resource Group and vNET in the correct Region and/or Subscription
NOTE: If you have Servers that you need to move as well, you may need to setup Peering between the two vNETs so you can move the Server(s) and Hosts separate from each other. -
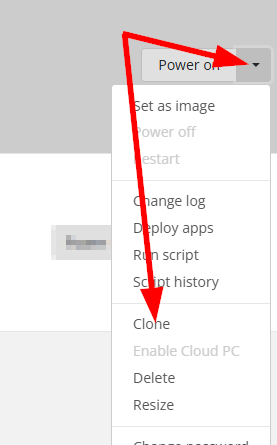
Clone your Desktop VM into the new vNET/Resource/Region
- Create a new Azure Files share in the correct Resource Group/Region/Subscription
- Create a new FSLogix Settings Profile for the new Azure Files Share
- Once you have the Image and FSLogix Storage configured, you're ready to create the host pool and your host(s)
(See Create a Host Pool – Nerdio Help Center) - After the host pool exists, you'll want to setup your Auto-Scale Settings to match your existing host pool
See Auto-scale Settings for Host Pools – Nerdio Help Center - Once Auto-scale has configured the host(s), you will assign a test user to make sure everything is working correctly
Move your Servers
NOTE: If you do end-up moving your Domain Controller(s), be sure to update the DNS Server(s) on your vNETs after you make the move.
Obviously, if you don't have servers, you can skip this step.
Use Azure Resource Mover to move your existing VMs to the new Resource Group/Region/Subscription.
Luckily, if your Network Peering is in place, you can do this step outside of moving your AVD resources to help cut-down on the potential "fires" that may arise.
Make your Move
- Now that you're sure everything is working, you will schedule downtime to get the profiles moved
It's also a good idea to unassign the users from the old host pool at this point so they can't accidentally login while you're copying their profiles
See Moving Profiles to a new Storage Account – Nerdio Help Center - Once the profiles are done copying, assign the users to the new host pool and have them refresh their Workspace feed
Remote Desktop (App)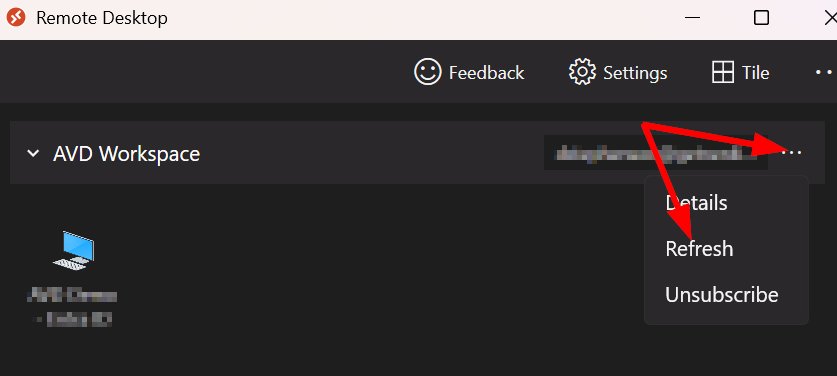
Windows App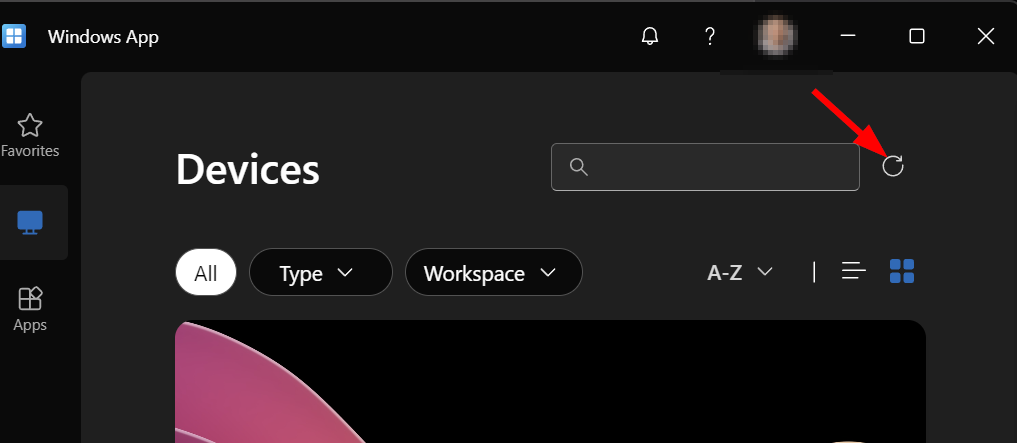
Cleanup!
After the users confirm everything is working, it's just a matter of removing the "old" resources
- Enable backups on your newly moved/created resources
- Delete the "old" Desktop Image from the previous Region/vNET/Subscription from Nerdio Manager
- Disable Autoscale on the "old" host pool in Nerdio Manager
- Delete the "old" host(s) in Nerdio Manager
- Delete the "old" host pool in Nerdio Manager
- Disable Azure Files Auto Scale for the "old" FSLogix Profiles in Nerdio Manager (Azure Files>Drop-down>Auto-scale>Configure>Turn-off>Save)
- Unlink the Azure Files Share for the "old" FSLogix Profiles in Nerdio Manager (Azure Files>Drop-down>Unlink)
- Remove the FSLogix Profile for the "old" FSLogix Profile in Nerdio Manager (Settings>Integrations>FSLogix Profiles Storage)
- Unlink the "old" Network from Nerdio Manager (Settings>Azure>Linked Networks)
- Unlink the "old" Resource Group from Nerdio Manager (Settings>Azure>Linked Resource Groups)
- Delete the "old" FSLogix Storage Account (in the Customer's Azure Environment)
- Delete the "old" Network (in the Customer's Azure Environment)
- Delete the "old" Resource Group (in the Customer's Azure Environment)
Please let me know if there are things that are unclear, you have questions, or if there are additional things you think should be done before, during, and after an AVD migration.
Comments (0 comments)